30 May 2011

Goat Cheese Drop Biscuits

In keeping with this weekend's Biscuit Festival in Knoxville, let's talk about drop biscuits. Now I grew up with biscuits that were rolled and cut. One time when I was still in Junior High School, a friend and I made some drop biscuits and they did not turn out well enough to convince me I should switch from my grandmother's recipe. Well, about four years ago Art Smith was on Oprah's show and he made some of his famous Goat Cheese Drop Biscuits. "These biscuits give a warm welcome to diners at Art Smith's Chicago restaurant, Table Fifty-Two."

A friend on a food board posted the recipe and I thought they sounded so good. Art Smith is a Southern boy at heart, so I trusted he knew how to make biscuits!!! Then a week or so later, there was Art Smith on Iron Chef America where the secret ingredient was cheddar cheese. He made a version of these biscuits using cheddar. Those looked great, too! Do you ever feel as if the universe is speaking to you? LOL. Drop biscuits had dropped back into my life.

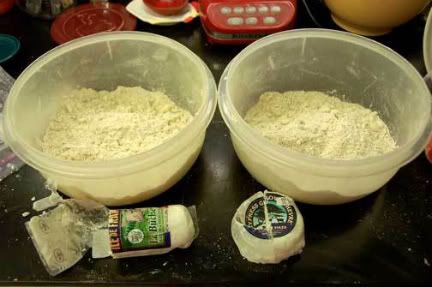
I promptly decided I needed to make these. At the time I first made them I had on hand a regular French chèvre and some Cypress Grove Purple Haze Goat Cheese. I elected to make two batches of the biscuits, one with each of the cheeses. They were both delicious! But I have to say that I really liked the ones with the Purple Haze the best. That is one of my most favourite cheeses (flavoured with lavender and fennel pollen), so I am sure that is the reason.

Nothing like doing two at once:


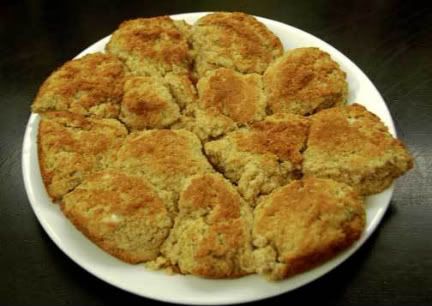
I used my cookie scoop to make the biscuits a uniform size:


And here is how they looked plated:


The friend who posted this recipe on the board also liked to make them with a smaller scoop and bake them in the individual cast iron skillets so that each person got their own. I love that idea, but haven't remembered to look for the mini skillets when I've stopped at the Lodge Store in South Pittsburgh, TN. Maybe next time!

Since that day I have made these biscuits quite a few times, but these days I use Belle Chèvre, our LOCAL award winning goat cheese. To simulate the Purple Haze from Cypress Grove, I add some fennel pollen and lavender flowers to the plain cheese from Belle Chèvre and I am happy.

Goat Cheese Drop Biscuits
adapted from Art Smith
Makes 12 biscuits

2 cups self-rising flour
2 tsp baking powder
1/2 tsp baking soda
1 tsp salt
4 Tbsp cold butter
4 Tbsp goat cheese
1 cup buttermilk
Extra butter to grease pan and top biscuits
1/4 cup grated Parmesan cheese

Preheat your oven to 425°F. Place a 10" cast iron pan into the oven while it is preheating.

Mix flour, salt, baking soda and baking powder into a medium-sized bowl. Cut in the butter and goat cheese. Make a well in the middle of the ingredients and pour in the milk. Stir until the mixture is moistened, adding an extra tablespoon of milk if needed.

Remove the hot skillet from the oven and add a tablespoon of butter. When the butter has melted, drop 1/4 cupfuls of batter into the pan. Brush the tops of the biscuits with melted butter. Bake from 14–16 minutes until browned on the top and bottom. Remove from the oven and sprinkle with the grated cheese. Enjoy warm!

Notes:

1. I do not keep self-rising flour on hand. However when I took Food Prep 101 at college we learned several ways of making our own. This one is supposed to be optimum if the recipe called for buttermilk and is what I use to make these biscuits:
2 cups flour
2 tsp baking powder
1 tsp baking soda
1/4 tsp salt

Mix together and use as directed.

2. For recipes that don't use buttermilk, the substitution I use is 3 tsp baking powder and 1/4 tsp salt for every 2 cups flour.

I'm linking this to Michael Lee's Foodie Friday @ Designs By Gollum, Friday's Favourites by Sandi & Bill @ Whistlestop Cafe Cooking, and Kim's Recipes to Run On.

Thanks for stopping by today!

namasté,
Bookmark and Share

28 May 2011

Blue May Flowers


For some time now I have wanted to do a tablescape using a blue and white flower cart patterned tablecloth I found.

It's such a cute design and it gave me a chance to use some of my favourite blue dishes.

April showers bring May flowers. How many times have we heard that line? We did get a good bit of rain in April and there are lots of flowers blooming now. I particularly love hydrangeas. And don't they look lovely in a vase next to the Harlequin candleholders?


I love all hydrangeas, but I am especially fond of the lace caps. My great-great aunt had huge bushes of lace cap hydrangeas in her backyard. When I was in high school, my Mom got a cutting and planted it outside my bedroom window. I used to love to look out and see that bush in full bloom. Now I have a lace cap hydrangea living in a pot on my balcony. It grew well last year and then survived the winter. This year it is doing even better. One thing I like to do is put little mini-vases at each place setting so everyone gets a flower or two of their own.


This is not a standard relish dish. It is combination of a cobalt Fiesta relish base and Harlequin blue Harlequin relish inserts.


This cobalt glassware is another of my favourites. It was made by the Louie Glass Company in 1936 as a tribute to the Marx Brothers. This particular style is Harpo and is somewhat easier to find than the other brothers.


I was lucky enough to find what I think are the perfect napkin rings for this tablecloth - ceramic watering cans.


The first one of these I ever saw was a dead ringer for persimmon P-86 Fiesta. I have since found them in other glazes that also match Fiesta colours (seamist, sunflower and sapphire), but I still haven't found out who made them.

I also like the blue plaid flatware with this table:


Gracing today's table:
Vintage blue and white flower cart tablecloth
Sapphire post-86 Fiesta plates and tabbed platter - Homer Laughlin China
Cobalt vintage Fiesta relish base - Homer Laughlin China
Harlequin blue Harlequin relish inserts and candleholders - Homer Laughlin China
Harpo pitcher and water glasses - Louis Glass Company
Contemporary wine goblets
Watering can napkin rings - unknown maker
Napkins - Pier 1
Flatware - bought on eBay
3 Vintage blue vases - unknown makers
Candles from TJ Maxx


This week I am joining ~
The Tablescaper for Seasonal Sunday,
Smiling Sally for Blue Monday,
Marty @ A Stroll Through Life for TableTop Tuesday,
Jenny @ off on my tanget for Alphabe-Thursday where this week's Letter is "G" - G is for Growing blue things,
Susan @ Between Naps on the Porch for Tablescape Thursday,
Suzanne @ The Coloradolady for Vintage Thingy Thursday, and
Sandi & Bill @ Whistlestop Cafe Cooking for Friday's Favourites.


Thanks so much for stopping by today! Please also remember to register for my 5 Year Blog Anniversary Give-Away.

namasté,
Bookmark and Share

27 May 2011

Pink Saturday ~ The Third Birthday


It's a special day for Beverly @ How Sweet the Sound. She is celebrating the 3rd birthday of Pink Saturday!!! I started participating in Pink Saturday because it was somewhat of a challenge for me to find pinks to photograph and it has been a wonderful learning experience. To help celebrate this week, I would like to share some flowers from our farm. Come stroll around with me and see what all is blooming pink.

Trailing petunias


Sultanas


Yarrow


Verbena


Rose of Sharon


Lantana


Milk and Wine Lily


Zéphirine Drouhin Rose (the most heavenly fragrance)


Some of these flowers are old Southern pass-along plants. The Rose of Sharon is also known as Althea and is cousin to hibiscus. The Milk and Wine lilies are some I dug up from my great-grandmother's house when we first got the farm.

My great-grandmother was married in 1910 and she dug up and moved some of these Milk & Wine lilies from her mother's house to her new home. When my grandmother got married in 1929, she dug up and moved some of the Milk & Wine lilies to her house. When my Mom got married in 1952, she dug up and moved Milk & Wine lilies to the house where I grew up. These flowers had been growing at my great-grandmother's house for 85 years when I got mine back in 1995, so they are now well over 100 years old. I just love plants with a history.

HAPPY PINK SATURDAY BIRTHDAY! Do check out Beverly's blog to see how others have chosen to celebrate PINK this week.


Thanks so much for stopping by today! Please also remember to register for my 5 Year Blog Anniversary Give-Away.

namasté,
Bookmark and Share

26 May 2011

Pickled Ramps

Ramps, also known as wild leeks, are a treat only available for a few weeks in the early spring. They are native to Appalachia and through the upper Midwest into southern Canada. A number of places in the mountains have ramp festivals every spring. The reason ramps are so celebrated is that they are traditionally the first vegetable to grow each year. In the old days people were so happy to get their first fresh vegetable after a season of dried or canned ones.

I am trying to grow a ramp patch at the farm, but it is rather puny so far. Once I get to move up there, I’m sure I can nurture it into expanding and providing a good supply of them for us. In the meanwhile, I typically order some fresh ramps when they are in season.

Ramps can be substituted in many recipes that use onions. Although they are also called wild leeks, they are much stronger than cultivated leeks. Since I first got interested in them, I’ve been collecting recipes that specifically call for ramps. One of those is this recipe for Pickled Ramps in Momofuku, the cookbook from David Chang of Momofuku Noodle Bar in New York City.

There the pickled ramps are used to make a Ramp Ranch Dressing, but you can use them just about any way you would use other pickles. I like to mince some of the leaves and add to tuna or egg salad, for instance. Or I serve the bulbs on a pickle tray along side other pickled vegetables.

For the brine I used water, rice vinegar, sugar, kosher salt and shichimi togarashi (Japanese 7-spice mix):


And here are the pound of ramps with lots of roots still attached:


Ramp bulbs in one jar, tops in another and the pickling brine ready to add:


Ramps in brine:


Ramp greens in brine:


Jars cooling before going in the fridge:


Watch coming posts for the Ramp Ranch Dressing. And just so you know, next year I am going to try Tom Colicchio's recipe for Sweet Pickled Ramps from Think Like a Chef.


Momofuku Pickled Ramps
adapted from Momofuku

3 cups water
1½ cups rice wine vinegar
1 cup white sugar
2½ Tbsp kosher salt
2 tsp shichimi togarashi (Japanese 7-spice mix)
1 lb ramps

Mix the water, vinegar, sugar, salt and shichimi togarashi in a saucepan. Bring to a full boil to dissolve sugar. Alternatively put the ingredients in a large glass measuring cup and heat to boiling in microwave.

Clean ramps. Use a paring knife to trim the root, then peel the outer layer of skin and wash well.

Place cleaned ramps into a glass jar or a lidded plastic container (one that is safe for heating) and pour boiling liquid over them. Weigh down so that ramps are completely submerged. Let cool to room temperature, then store covered in refrigerator for about a week.

Notes:
1. Very young ramps with small leaves may be pickled whole. As the ramps get larger later in the season, trim the top of the ramp leaf, leaving about an inch of green. Tops should be saved for other uses (such as stock or pasta).
2. Pickled ramps can be stored in the refrigerator, or they can be canned for later use. Ramp greens should be used first (within a month) as they will go softer more quickly. Ramp bulbs will last in the refrigerator for several months.
3. This recipe made about a quart jar of pickled ramp bulbs and a half gallon jar of pickled ramp tops.


Thanks so much for stopping by today!

Namasté,
Bookmark and Share

24 May 2011

Scotch Eggs and the Rose & Crown


First of all:

Scotch Eggs are not from Scotland.

This tasty dish was invented in 1738 or 1851 (depending on which source you believe) by Fortnum and Mason, a British food merchant/department store, supposedly as food for travellers. The name came about because the eggs were originally wrapped in Scottish beef. Often considered picnic food, the eggs are normally eaten cold with pickles and a salad. In the US, English-style pubs often serve them hot with mustard for dipping.

This past December when we were at DisneyWorld, we ate at the Rose & Crown Pub in Epcot one day.


It's a nice place to sit down and have a snack or a brew. We were in no hurry, so we went inside where we had a nice table by a window.


Their bar is all dark wood and what most people would expect an Americanized British pub to look like:


While we perused the menu, the Guy had a Black and Tan.


We decided to sit a spell and order some plates to share. One of those is Scotch Eggs pictured at the top of the post. The eggs were served warm along with some dressed greens, mustard and toast points. It was quite good and the kids went back another day specifically to eat Scotch Eggs.

This is a really simple dish to make at home. You hardly need a recipe and you don't have to go to a pub to eat one!

My CSA is wonderful. I get the best free-range eggs from pastured chickens and sausage from a farmer who raises the pigs organically and hormone-free. With those kinds of ingredients, the taste is divine. I love all the different colours of our CSA eggs:


Here they are cooked and peeled:


Getting the rest of the ingredients, including the sausage from our CSA:


Sausage was divided into six portions to wrap the eggs. I flatten each portion into a thin patty, then wrap it around the egg to totally encase it.


Six eggs ready to chill before cooking:

(Yes, I know I hard cooked a dozen eggs. The other six are going to turn into Louisiana Stuffed Eggs.)

Set up a breading station:

Now I personally do not like a lot of breading on foods, so I only put the sausage-wrapped eggs in the egg wash and panko once. If you like a thicker coating, repeat rolling in the egg wash and bread crumbs.

Cooking in my great-grandmother's cast iron chicken fryer:


Draining and cooling on paper towels:


And plated on tangerine P-86 Fiesta plates:

Look at the beautiful colour of the yolks of true free-range eggs.

For garnishes I used salted, halved grape tomatoes, mustard, horseradish, Wickles, and pickled cocktail sticks:


It is always good to serve a nice acid with any sort of fatty food, whether it is naturally fatty or fried, as the acid helps with digestion. In the South it is traditional to ALWAYS have a pickle tray on the table with a variety of pickled fruits and vegetables. This is the first time I have used those pickled cocktail stirrers and they were quite good with the eggs. The sweet-hot of the Wickles also went well with them.

Even though I said you don't really need a recipe for these, I did look about some online before writing this post. Someone did an unusual version of Scotch Eggs using Italian sausage and seasonings. I'm thinking those might be an interesting addition on an antipasti tray. But if you've never made them before, start with the standard version and see how you like them. They are quite popular with several of the people in this family.


Scotch Eggs
6 hard cooked eggs, peeled and chilled
1 lb bulk sausage
2 eggs
1 Tbsp water
Salt
1 cup panko
oil, for frying
mustard, for serving

Divide the sausage into six equal pieces. Shape each piece of sausage around one of the hard cooked eggs. Place sausage covered eggs in the refrigerator to keep chilled as you use up the remaining sausage and eggs. At this stage they can be refrigerated for several hours. I would chill them at least half an hour before cooking.

Crack the two uncooked eggs into a bowl and whisk in the water. Season with salt and set aside. Place breadcrumbs in another bowl.

Remove sausage covered eggs from fridge. Dip each one in egg wash, then in bread crumbs and set aside on a plate. Place the eggs back into the refrigerator until you are ready to cook. They can rest in the fridge for another hour or so, if you like. Just cover well with plastic wrap. I normally fry them as soon as they are coated with the bread crumbs.

Heat oil in a deep fryer to 375°F. I prefer to use a cast iron chicken fryer. Just because. It's the best thing for frying. Carefully place eggs, one at a time, into the hot oil. Let cook 3 to 4 minutes, then turn to cook the other side. Do not crowd the skillet. Remove from oil and drain.

Let cool for 5 to 10 minutes, then slice in half lengthwise. Serve with mustard and other chosen garnishes.

I'm linking this to Michael Lee's Foodie Friday @ Designs By Gollum, Friday's Favourites by Sandi & Bill @ Whistlestop Cafe Cooking, and Kim's Saturday Swap over at Quit Eating Out.

Thanks for stopping by today! Please also remember to register for my 5 Year Blog Anniversary Give-Away.

namasté,
Bookmark and Share